Obsolescence Guaranteed
Recommended: Gigatron
a computer w/o a microprocessor

We're moving to a new site
Now there are so many people involved in the PiDP replicas,
it's become time to move things to a new group web site.
Use the button below for the new 'How to Use' page;
although I'll keep the old version down below for a while yet.
How to use the PiDP-8/I
After power-up, log in to the Pi. Either through HDMI, ssh, serial port, telnet, or VNC. The virtual PDP-8 always runs concurrently/in parallel with the normal Pi environment. Note: If the stop switch is depressed during boot, the PDP-8 will not be fired up.
The default setting (all switches set to 0 - down) will boot you in to OS/8. If you hit "Ctrl-A d", you detach yourself from the PDP-8 and you'll enter the normal Linux environment. Enter pidp8i to return to the PDP-8. See the PiDP-8 manual in the download section for more details.
You can use the three IF switches to select what PDP-8 boots in to. Set the switches according to the table below to make your selection. Or, when you're already using the PDP-8, reboot into these options at any time by setting the IF switches, and then toggling the Sing_Step switch. After that, it's a good idea to set IF back to 000 so as not to disrupt any following front panel actions.
Octal IF switches Description
-----------------------------------------------------------------------
0 000 OS/8 on RK05 10MB disk cartridge
1 001 RIM Loader at 7756, paper tape/punch enabled
2 010 TSS/8 multi-user system. Up to 7 other logins with
telnet can be used for other users
3 011 OS/8 on DECtape
4 100 Spacewar! With vc8e output on localhost:2222
5 101 (empty slot)
6 110 ETOPS: multi-user clone of OS/8.
7 111 Same as slot 0
Storage Concept: USB tapes, USB disks & USB disk cartridges
Before taking a quick tour through the PDP-8 world, you need to understand how the PiDP deals with storage devices. You can of course attach disk/tape images through the SimH command line. In other words, hit CTRL-E, then enter 'attach ptr <filename>' etc. Read the SimH manual for details.
More authentic (using the word very loosely) is the PiDP's alternative. Use a USB hub attached to the PiDP (the USB ports on the Pi work fine too). Now, save any disk/tape images you want to use on USB sticks. Label the USB sticks with the appropriate label templates (link to powerpoint file), and they act as paper tapes, diskettes or disk cartridges.


DEC tape & disk labels for use on USB sticks
Mounting a USB tape/disk/cartridge:
-
insert the 'USB tape' or 'USB disk' into a (any) USB port
-
select the device you want to mount on by entering a value on the Data Field switches (leftmost 3 switches):
Octal DF Switches Device
----------------------------------------------------------------
1 001 PTR (paper tape reader)
2 010 PTP (paper tape punch)
3 011 DT0 (TU55 DECtape unit 0)
4 100 DT1 (TU55 DECtape unit 1)
5 101 RX0 (RX01/02 floppy disk drive unit 0)
6 110 RX1 (RX01/02 floppy disk drive unit 1)
7 111 RK1 (mounts a second RK05 unit)
-
toggle the SING_STEP switch
The PiDP will scan for image files compatible with the device you have selected on the USB sticks. It simply mounts the first file, that's not mounted yet, with an extension (.pt, .dt, .rx, .rl) that fits the selected device. -
Disk/Tape is mounted. If the mount fails you'll be notified of it. By the way, if you want any other devices added to the mount list, the PiDP software is easy to modify for that.
In summary:
There are four special switch actions for the PiDP. (1) select a storage device to mount a USB stick on, (2) (re)boot into another configuration, (3) full system restart, (4) system shutdown. In each case, you set switches, then trigger the desired action by toggling the Sing_Step switch. When doing a shutdown, always wait 15 seconds before unplugging the power.


Punched paper tape - folded for high speed reader

The PC04 High Speed Reader
1969: running FOCAL69 from paper tape
Focal was a radically useful program in the early days of the PDP. Before Focal, you would load an editor, punch your program it to tape, load the assembler from another tape, load the source code, assemble, punch a executable file, then load that tape to run the program. It is even more painful than it sounds.
Focal, like Basic, was revolutionary because it was Interactive. You did not have to go through that cumbersome compile cycle. You just typed in your program's instructions, ran it to see how it went, and made your changes along the way. All without any loading from or saving to tape. You could even use it as a calculator! This was huge progress in usability.
Reboot the PDP-8 to RIM loader/paper tape configuration: set the IF field to octal value 1, then toggle Sing_Step. A PDP-8 comes without ROM, so when it's powered on, it starts running something undefined. However, core memory - as opposed to modern-day RAM - is nonvolatile, and you are lucky. The PDP-8 still has its RIM Loader - the primitive bootstrap to read in a paper tape - left in core memory at addresses 7756-7775 from the last time it was powered up. That is not unusual: many programs left the upper page of memory untouched so users did not have to keep toggling in the RIM Loader.
To verify that the RIM Loader is indeed OK:
-
hit the STOP switch to halt the computer,
-
set the SR switches to 7756, the address in memory where the RIM Loader starts
-
hit the LOAD_ADD switch to toggle the switch values into the PC. Check - PC register shows 7756
-
hit the EXAM switch to retrieve the contents of the address on the MB line. It should be 6014, because this is the high-speed RIM Loader.
-
note that the PC register has already increased to show the next address, 7757.
-
Hit EXAM to read the value stored in that address, it should be 6011.
-
continue all the way to 7775 if you want to check the integrity of the RIM loader. At any point when you get tired from checking, continue with the steps below.
The RIM Loader exists solely to load a paper tape with primitive encoding that contains the BIN Loader, a more elaborate bootstrap program that would be far too long to toggle in manually. So the primitive RIM loader is used just to get the more robust BIN loader into memory. The BIN Loader will then load whatever software you want.
-
PDP-8: Put the BIN Loader paper tape into the reader
PiDP: put the BIN Loader USB stick in a USB slot,
then ensure DF switches are set to 001 and press SING_STEP to attach tape to the PiDP.
then set the DF switches back to 000. -
set the SR switches to 7756, press LOAD_ADD, and press START.
-
The front panel will come to life and after a few seconds, the tape will be loaded into memory. Because the RIM loader needs to be as short as possible, it does not exit gracefully.
You just hit STOP. With a real PDP, you'd do that when you see the tape is through...
The BIN Loader is now loaded into core memory. It occupies addresses 7625-7752 and address 7777.
To check it has indeed loaded:
-
Set the SR switches to 7777 and hit EXAM.
The MB line should show the value 5301. -
Hit LOAD_ADD. Address 7777 is also where the BIN loader needs to start executing.
But before hitting START to run the BIN Loader program:
-
PDP-8: remove the BIN Loader tape and put the FOCAL69 tape into the reader
PiDP: remove the BIN Loader USB stick and put in the FOCAL69 stick,
then ensure DF switches are set to 001 and press SING_STEP to attach tape to PiDP.
then, set DF switches back to 000. -
Set the SR switches to 3777.
The BIN Loader will read the SR switch settings and take this as your signal that the High Speed Reader should be used - not a slow Teletype paper tape reader. -
Now hit START. The PC still contains 7777, so that's where execution starts. After a few seconds, the BIN Loader tape has been read in and the PDP-8 stops executing. As opposed to the RIM Loader, the BIN Loader does end elegantly once it has done its job.
Focal has now been read into memory. Normally, RIM and BIN loader will both remain in the upper page of core memory, ready for a next program load after you are done with - in this case - Focal.
But for now:
Run Focal by setting the SR switches to 0200, the start address of Focal, hit LOAD_ADD and then START. The Focal prompt (*) will appear. A new era in computing has arrived on your PDP: the interactive programming language. Type _TYPE "HELLO, WORLD" and you will never go back to non-interactive computing again...
Where to go from here:
-
read the Focal69 documentation to explore its potential.
-
read Lawrence Woodman's blog post to get more insight into the process you just went through.
If you're done with PDP-8 goodness for now, use CTRL-E to escape out of the PDP-8 environment, into the emulator command line. type 'exit' to go back to the Raspberry Pi, or 'go' to return to the PDP-8.
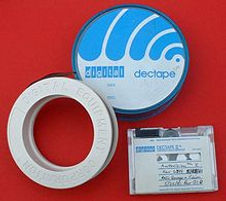
DECtape: magnetic tape with random access

The TU56 DECtape unit
1972 Test drive: adventures with OS/8 on DECtape
In the hey day of the 8/I, floppy disk drives were not used. Instead, magnetic tape (DECtape) drives were the advanced storage medium. They worked like floppy disks: you can read in a particular block of data into memory, and overwrite that block. The only difference is that a lot of tape spooling was necessary to reach the desired blocks.
The PiDP can use floppy disk images just as well as DECtape images. But DECtape is the real deal.
OS/8 was a typical operating system for its time. But operating systems were not typical at all for small computers like the PDP-8, and that made OS/8 revolutionary. CP/M users will recognise quite a bit (PIP!) and MS-DOS users too will not feel too out of place. There's built-in commands, utility programs, and applications. Like Basic, Fortran, editors, but also games.
Reboot the PiDP to DECTape configuration: set IF field to octal 3, then toggle Sing_Step and set IF switches back to 000. This mounts a bootable OS/8 dectape, with system utilities and Fortran. Booting from tape takes a good few seconds (tape is supposed to be slow, but for simh experts: this boots from dt0, not td0. So the slowness of real tapes is properly emulated!). You are then presented with the command line prompt (.). Enter DIR to see what's on the tape. After a good few seconds more, you'll see the directory. Let's compile the test.ft Fortran program:
-
R F4
-
TEST<TEST ...wait for a minute...
-
$ ...press ESC and wait for a few more minutes...
-
DIR TEST.*
-
EXE TEST.RL
Where to go from here:
-
This blog is a useful starting point for delving into Fortran on the PDP-8
-
Read the relevant DEC manuals for more information.
-
Either learn to use the TECO editor, or learn to import source files out of your comfortable Linux environment. TECO hurts, be warned.

RX01: Two 8 inch floppy disks

RK05: Removable hard disk cartridge
Mid 70s: Using floppy and hard disks in OS/8
Although DECtapes were a huge improvement over paper tape, with OS/8 and block-oriented file systems now possible, it remains a slow process. With the introduction of hard disks and 8" floppy disks, the PDP-8 entered the modern era. Now, using OS/8 does not feel very different from CP/M or early MS-DOS systems in terms of speed and - dare we say - capabilities.
Reboot into OS/8 by setting the IF switches to 111, and toggle Sing_Step. This mounts and boots an RK05 disk cartridge with OS/8 on it. There are two partitions, so just typing DIR will show you only the directory of the first one. DIR RKB0: will show the many games and utilities on the second one.
Try to run the classic Colossal Cave adventure: RUN RKB0 ADVENT. Use QUIT to go back to OS/8.
Run the Game of Life using R BASIC, OLD, RKB0:LIFE, RUN. Use Ctrl-C and BYE to return to OS/8.
By now, it should be clear that the PDP-8 has evolved from a paper tape eating dinosaur to something awfully close to what personal computers would become 5 to 10 years later. In short: the PDP-8 presaged the personal computer era - and helped define many of the concepts and paradigms of the microcomputer revolution!
Where to go from here:
-
Read the DEC manuals for OS/8
-
Look on PDP-8 Online for documentation on CHECKMO II, the first PDP-8 chess program, Adventure, and many other programs.

The original DEC X/Y display

A typical spacewar controller

My homebrew spacewar display option,
using a $20 HDMI display
1974: Play spacewar!
Spacewar! was the first video game ever. And a good one. Originally written for the PDP-1 in 1962, it was ported to quite a few other machines over the years. The PDP-8, it seems, got its definitive version in 1974, and required a vc8i oscilloscope display or vc8e point-plot display option. Originally, spacewar! used front panel switches, which was not a good idea as it wore them out quickly. So, typically, custom-made controllers were made to properly play the game.
These are not computer displays as we know them today. The VC8-E generates a picture by the processor specifying an X and Y location and then requesting that a spot be drawn on the CRT. It then repeated this process to draw the entire display out of a bunch of dots. 60 times a second.
In 2015, Kyle Owen made a VC8-E simulator to be used with SimH. You can either run it remotely on a PC that acts as an X/Y CRT, connected to the PiDP. Alternatively, run a Pi-specific version of the vc8e emulator on the PiDP itself, and the HDMI port of the PiDP itself can be used.
-
Reboot the PiDP by setting the IF switches to octal 4, then toggle Sing_Step. This loads the spacewar program at 0200, and sets up the VC8-E interface.
-
3 display options
(you'll want the first though):-
DJ's VR14 emulator,
details here.
-
-
-
The old way: On your PC, install Processing. Load the vc8e.pde program, before you run it, replace the word localhost by the IP address of your PiDP in the line
s = new Client(this, "localhost", 2222);
Use 1,2,3,4 on your keyboard as the player 1 controls, 9,0,-,= for the player 2 controls. -
On the PiDP itself, you can use the vc8e emulation program (link) to use the on-board HDMI display. Use front panel switches SR12-9 and SR4-1 on the HDMI version.
-
Using keys or front panel switches is not quite how spacewar is meant to be played. You can create your own spacewar controllers (box+4 buttons+bit of wire), which is how it was meant to be done, and connect them to the solder pins of the front panel switches.
Where to go from here:
-
This section does not do justice to spacewar. It is a whole topic unto itself. Go to the mass:werk spacewar site now to play the original PDP-1 versions, and read up on its history. Or use this site for a quick overview.
-
Spacewar controls need to be done well. Start with Thomas Tilley's site here.

Time-sharing a PDP-8/e in the early 70s

TSS/8 Manual
1975: Multi-user with a late version of TSS/8
We're blurring the time line by the mention of the year 1975. TSS/8 had been around since 1968, and performed an astonishing feat: an 8 (32, if you insisted) user multitasking operating system allowing you to log in on multiple terminals, giving each user a full 20K virtual PDP-8, despite the hardware only having 32K words in total. It provides Basic, Focal, editor and assembler and more out of the box. If you define the concept broadly, it does email too... Once you've mastered TSS/8, take away the PCs of seven of your work colleagues and let them log in to TSS/8 user sessions on the PiDP. There is nothing more you need to run your company than a single PDP-8 with TSS/8 offers, with a bit of home study. Prepare to hire more competent staff soon though.
Set the IF switches to octal 2 and toggle Sing_Step. This will boot TSS/8, and ask you the following:
-
LOAD, DUMP, START, ETC? Enter START
MONTH-DAY-YEAR: Enter 01-01-85 (no later year allowed)
HR:MIN - hh:mm Enter 23:23 (numeric, 24 hour format)
Type an extra return to get the attention of TSS/8, and you see the command prompt (.).
-
Login using one of the existing accounts. The login command won't echo on the screen, but type: LOGIN 2 LXHE (privileged library account)
-
Check the directory by entering R CAT. Then run Basic (R BASIC), and enter NEW, 100 PRINT "HELLO WORLD", 110 GOTO 100, 120 END, RUN. You can stop the program any time by hitting CTRL-C and using BYE. But don't do that yet...
-
Use another login (under X, another xterminal. Or SSH from another PC, or use the serial terminal) and start telnet (typically, "telnet localhost 4000" if you do this on the PiDP). Now, hit return to get attention from the PDP-8, and type LOGIN <user#> <password> as one of the following users:
User# Password | User# Password
------------------- | --------------------
1 VH3M | 3 SHUG
2 LXHE | 10 WBCN
Where to go from here:
-
The TSS/8 user manual is here (link). This also contains the very useful instructions to get rid of the physical front panel, and use comfortable terminal commands instead! After all, not all users will sit next to the PiDP. And they should not mess with TSS/8 but with the virtual PDP-8 asigned to them.
-
Read the original publication that introduced TSS/8.
-
Study the other DEC documentation for the various programs available.
-
Pause for a second and remember this was available in 1968...

2015: The SimH simulator console
There were 10 implementations of the PDP-8 design over its life span of 15 years. The 8/I was built using only simple 74 logic chips, but the Straight Eight only used discrete components (diodes, transistors). The last few models actually moved on to use a microprocessor with the PDP-8 logic inside. Now think of SimH as the 11th implementation of the PDP-8 design. It may be done in software, but the PDP-8 always was a computer architecture, not a single hardware design.
Yes, there will always be a yearning to run Real PDP-8 Hardware. But SimH is the best implementation of the PDP-8 architecture to date... Set breakpoints, disassemble on the fly - the kind of stuff that programmers back in the day would have given an arm and a leg for.
The fact the PiDP is based on SimH has one huge advantage: at any point in time, you can hit CTRL-E and use the simulator command line to debug the PDP-8 to your heart's content. For full details, read the SimH PDP-8 manual and the overall SimH manual. Below is a quick tour of SimH features. When on the simulator command line, enter 'co' at any time to return to the PDP-8.
At any time, step out of the PDP-8 by hitting CTRL-E. Go back by entering 'cont'.
Managing Peripheral Devices:
-
See what peripherals are hooked up: show dev
-
See the settings for each peripheral: show <dev>, e.g., show PTR
-
Enable or disable a device: set <dev> enabled/disabled
-
Attach a disk or tape image to a device: attach <dev> <filename>
Looking into the PDP-8:
-
Examine memory: ex 7756-7770 for a octal dump
-
Disassembly: ex -m 775607770
-
Examine PC register: ex pc
-
Examine DF register: ex cpu df
-
View & edit memory: ie 7756 <cr> 01 <cr>
-
Change MA register: ie ma 0200
-
View & change DF register: ie cpu df <cr> 5 <cr>
-
Debugging: break 7761: set breakpoint. break 7761/2: break on second run
Running & Loading Programs:
-
Continue execution: cont;
-
Start execution with new PC: go 0200;
-
Start execution with reset cpu: run 0200
-
Loading a binary file: load <filename>
-
execute a script of command line commands: do <filename>
by the way, pdp.ini would be a startup script that's always run
Online Help:
-
help. Or help cpu. Or help ptr.
Where to go from here: things like multiple terminals, and much more:
-
The PiDP-8 Wiki at Tangentsoft
There are many good sites with P(i)DP-8/simh software adventures, google around. But here are some articles from Raymii's site:
Epilogue
The point of this PDP-8 history tour was not to teach how to use a PDP-8. Rather, the idea was to illustrate how utterly unique the PDP-8 was in the evolution of computing. Born in the era of paper tape chewing, front panel programmed dinosaurs, it evolved all the way to running a proper operating system (even multi-user virtual machines!) from 10MB disk cartridges.
But much more importantly, the PDP-8 drove a lot of that evolution. It defined the founding principles of personal computing which emerged half a decade later. Not to put too fine a point on it: it was pretty much the prototype of a personal computer.
That's not to say that all of these founding principles of personal computing were born on the PDP-8. Just like the Macintosh did not invent windows and mice. But the PDP-8 was the machine on which many of the founding PC concepts broke through, were tested and refined, and were picked up by the future shapers of the personal computer revolution. Quite possibly, there has not been a more important computer in history. Enjoy the ride!
PiDP-8/I: RECREATING THE PDP-8/I
CELEBRATING 50 YEARS OF PROGRAMMED DATA PROCESSING


