Obsolescence Guaranteed
Recommended: Gigatron
a computer w/o a microprocessor

KIM Uno: a DIY clone of the KIM-1
924 bytes. To play chess.

Introduction
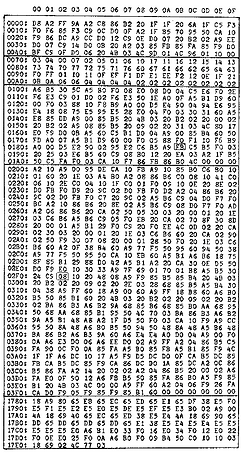
Peter Jennings published Microchess in December 1976. It became the Killer Application for the KIM-I... a full chess program in 924 bytes of 6502 code! Microchess was a defining moment in early microcomputer development - and also is a work of art, a coding masterpiece. Jennings' own site (link) gives a fascinating account of how it came to be.
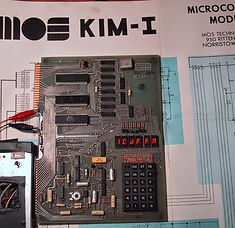
To put some context to this: imagine it's 1976. Microprocessors have emerged over just the past 24 months. Some guys have apparently written a Basic interpreter and an operating system for the 8080 microprocessor, but their setups cost ten times as much as the new $245 KIM-I, a minimal demonstration computer board sold by MOS to showcase their brand-new 6502.
Imagine having no assembler, no software tools and no access to information other than the manual and data books... entering hand-assembled hex codes into the KIM-I and creating a chess-playing program in just 924 bytes.
That begins to tell how awesome Microchess really is. Yes, the 924 hex values in the picture are all you need to play chess. Less than 7 tweets could contain all that complex logic...
This version of Microchess is the one found on Peter Jennings' site. It adds a routine at its end that prints out its board on the serial port. Playing on the KIM Uno without a serial terminal will create a right proper pioneering KIM-I kind of feel... Meaning you get to see the moves on the LED display, but for an overview of the board you still need the serial port hooked up. Unless you have an actual chess board on which you keep track.
Command Summary
Microchess was recompiled to run from a ROM at $C000. So enter C000 [GO] to start. Enter Q (serial port) or [RS] (KIM keypad) to go back to the KIM monitor.
-----------------------------------------------------------------------
|KIM Key (Serial keyboard) | KIM Key (Serial keyboard) |
|---------------------------------------------------------------------|
| C (C) Clear Board | 1-7 (1-7) Keys to enter move|
| E (E) Exchange sides | F (Return) Register move |
| PC (P) Play | |
|---------------------------------------------------------------------|
| *4 (L) Load Board | *5 (S) Save Board |
| + (W) Toggle Blitz (fast & dumb) / Normal play (100sec/move) |
-----------------------------------------------------------------------
Gameplay is intuitive if you think of it this way:
-
Start with C-E-PC (Clear-Exchange Sides-Play) to ask Microchess for a move.
-
If you are lazy, you keep doing E-PC-E-PC-E-PC to let Microchess play itself.
-
Or, you enter your own moves by entering (example - see below) 1333 F,
followed by PC to let Microchess make its next move in response.
Some extra functions have been added, based on suggestions in the Microchess
manual. These are implemented as interventions on top of the 6502 emulator.
Rest assured, no vintage bytes from within Microchess have been
hurt in the process. You're running 100% original 6502 Microchess :)
Blitz mode: [+], or W, toggles between normal speed (approx. 100 sec per move) and Blitz mode (approx. 10 sec. per move, the default setting). Note that on the serial port, a dot is printed for every step taken during Microchess' next move calculation. On the KIM display, you see nothing until Microchess is done with its calculations - which is how it was originally...
Save Board: You can save your game using the EEPROM in the Arduino. This simply saves the current chess board so you can continue playing at a later time. Press S (serial) or ?? and then enter the slot number you want to save to - a number from 0 to 9. Confirm by hitting return (serial) or ?? and the board is saved. Load board: done by L (serial) or ??. This retrieves a saved game and allows you to continue to play it.

This version of Microchess outputs the board to the serial port - and takes instructions from it as well as from the KIM keyboard. It adds a couple dozen bytes to the original 1976 program, but greatly improves usability.
Microchess as played without a terminal hooked up to the serial port: moves as shown on the LED screen. Have a real chess board at hand to keep an overview.

Further reading on MicroChess
The original manual is here (link). To translate between the Kim-I keys and the keys on the serial terminal:
Kim-I key Arduino Serial port
C | C
E | E
PC | P
F | Return
Original source code of Microchess for serial terminal: do not use http://6502.org/source/games/uchess/uchess.htm. It's an older version with some bugs. Instead, use http://benlo.com/files/Microchess6502.txt.
Changes I made to this source code:
-
relocated code to $C000
-
replaced 6551 UART terminal by a simpler virtual UART which I added to the KIM as a secondary way to drive the serial port. See Arduino CPU.C source code for details.
-
the print-to-serial routine added to this Microchess version uses the PHY instruction which is only present in newfangled 65C02s. I removed it, wasting 1 byte for temp storage in the process.
The version thus arrived at can be downloaded in the download section.
Just to make sure proper credit is given
A thank-you to the genius of Mike Chambers and obviously to Peter Jennings. The code is theirs, the bugs are mine. All I did was recompile Microchess with marginal UART changes, and paste it into Mike's 6502 emulator code. Microchess is used with permission of Peter Jennings, but note that Microchess is not open source code.
Quick Guide: How to Play Microchess
Enter C000 [GO] to run Microchess. If you want Microchess to play its best, leave Blitz mode by pressing [+], or W (that's shift-W) on the serial terminal. But the 100 second wait for moves to be calculated is probably annoying. The board print-out confirms by a line showing >N<.
1. Initialise
=============
Enter C for Clear. Actually, at any time, hit C to reset the game.
--> The board is reprinted & bottom shows CC CC CC to confirm.
2. Let the computer play against itself
=======================================
Enter E to make the computer take the opposite side of the board.
--> The bottom line shows EE EE EE to confirm you swapped chairs.
Enter PC (P on serial port) to make the computer Play its move.
--> Deep thought happens. Every few seconds, a dot appears on the serial
terminal to indicate one more possible move has been thought through.
But the LEDs go dark for this period - that's how it is supposed to be.
--> Typically, you'll see 30 or so dots before the computer is done.
In the default Blitz mode, it takes about 15 seconds on a real KIM-I,
more or less the same on the Arduino. In Normal mode, about 100 seconds.
When the best move has been decided, MicroChess prints out the board again.
--> The bottom line shows its move in 3 hex numbers, also shown on the KIM Uno LEDs.
Hex number 1, left digit: 0 if a Black piece was moved, 1 for White
Hex number 1, right digit: Tells you what piece this was:
----------------------------------------------------------------
| 0 - KING | 4 - King Bishop | B - K R Pawn | C - K B Pawn |
| 1 - Queen | 5 - Queen Bishop | 9 - Q R Pawn | D - Q B Pawn |
| 2 - King Rook | 6 - King Knight | A - K N Pawn | E - Q Pawn |
| 3 - Queen Rook| 7 - Queen Knight | B - Q N Pawn | F - K Pawn |
----------------------------------------------------------------
Hex number 2 is the FROM square (row, column).
Hex number 3 is the TO square (row, column).
So you can let the computer play both sides by hitting E, then PC, E again, PC...
3. Entering your own move
=========================
Instead of hitting PC (or P on serial port), you can enter the 2-digit FROM square and then the 2-digit TO square. After every digit, you'll see the board reprinted. But focus on the bottom line: the digit you press "rolls in" to the bottom line's Numbers 2 and 3 from right to left. This is a remnant of how the KIM-I uses its onboard LEDs.
After four digits, the move is defined. MicroChess shows the piece involved in Hex Number 1: first digit is 0 for white, 1 for black. Second digit is as per the table above.
Once your move is complete, hit F (or Return on serial port) to register your move.
--> FF appears in Hex Number 1: you have now moved the piece,
so FF is there to show that the From square is now empty.
After you've registered the move you can still undo it. Just correct the wrong move by entering four more digits in a correcting move, so that the board looks like you intended it to.
Indeed - this is the fundamental point to grasp: MicroChess does not check what you're doing when you move pieces around. You can move its pieces as well as your own. All you are doing here is rearranging the board for the next round of Microchess Deep Thought. You can make a normal move, or shift stuff around on the board as you wish to create a new situation that MicroChess should play against next. It's a feature, not a limitation!
--> Hit PC to make MicroChess Play its next move.
4. Special moves:
=================
Castling: just move the two pieces and hit Return after each one to register them both.
En passant: break the move up in two moves. Mid-point being on the piece you strike out.
Queening pawns: yes. Well. Remember which of your pawns has been Queened and give it the according moves afterwards. MicroChess will not Queen on its side. (It can be done by leaving the program and manipulating its memory through the KIM Monitor).


